How to Cook Your Freshly Caught Fish
So fisherman all across the country has been handed down methods of cooking fish. Here are some tips to get the best out of your fish.
1.Frying
Frying a freshly caught fish is as good as it gets. The smell of butter emanating from the frying pan and the flair a fisherman puts in flipping his catch is worth its weight in gold, almost.
For the novice fisherman, make sure that the butter is extra hot but not yet burning. Also, make sure that the fish is well coated in batter. Season your batter to your heart's content, salt and pepper never goes wrong. You may want to try other herbs and spices with the batter for a more delicious fish.
2.Grilling
At first glance, grilling would seem to be the easiest way to handle your fish. A newbie might assume that grilling fish is the same as grilling steaks or burgers. Unlike fowl or cattle, fish tends to secret most of its own juices when cooked. On a grill the delicious juice drips into the coals. To prevent losing the moisture, first coat the fish with oil.
The oil will seal a part of the moisture inside. Second, keep an eye on the fillets and turn them as soon as a cut would reveal that the fresh fish is cooked halfway through.
After being flipped, watch the fish carefully. Remove the fish as soon as it is cooked through.An option to basting the fish with oil is to wrap it in aluminum foil. The aluminum foil will keep the moisture and marinate the fish in its own moisture. Placing herbs and spices inside the foil with the fish enhances the grilling process and the fish itself.
3.Baking
Baking is the best option for the fisherman who does not want to watch over the fish during cooking. The fisherman can prepare the marinade and pre-heat the oven, then pop the fish into the oven for a predetermined amount of time. You may want to check on the fish from the time to time, ensuring that you don't overcook the fish. Whatever fish you caught, a good recipe and proper cooking will for sure enhance the catch. Take time to prepare for cooking, a badly cooked fish will no doubt spoil your day. Remember the first rule of cooking, don't overcook your fish.
Source: Free Articles from ArticlesFactory.com

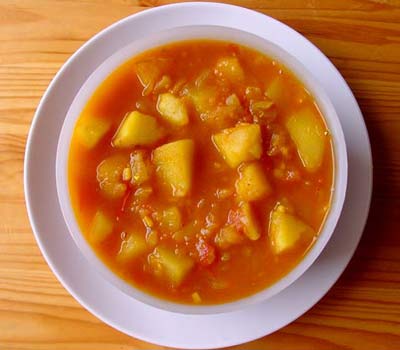
How to Cook Potato Curry
This Potato dish is a nice change from traditional mayonaise and mustard based potato salads, with a lot less calories. Instead of the fat of mayonaisse for flavor, dilly potato salad uses herbs and dijon mustard for a flavorful effect. You can use any type of potato that you have on hand for this dish. A potato that boils well and tastes good is the Yukon Gold.
Ingredients:
* 1/2 cup frozen peas,
* 1/2 cup coarsely chopped green pepper,
* 1/2 cup coarsely chopped celery,
* 3/4 cup dijon mustard,
* 4 to 5 tablespoons olive oil,
* 1/2 cup black olives chopped or presliced canned,
* 3 tablespoons chopped fresh dill, or 2 tablespoons dried,
* 3 tablespoons chopped fresh parsley, or 2 tablespoons dried,
* 8 medium to large sized potatoes,
* salt and pepper to taste
Recipe Directions:
Wash potatoes well by scrubbing off the dirt off. Cut potatoes into 1 to 2 inch cubes. Add cubed potatoes to pot of water. Boil water to a boil and cook potatos until they are firm, yet done. Test potatos by piercing with a fork. They should not be too mushy, for this will affect how the potato salad holds together. If they are too mushy you will have dilly mashed potato salad. When potatos are done, rinse with cold water in a collander. This will keep the potatoes from cooking further. When the potatos feel luke warm, add to a large mixing bowl.
Take the frozen peas and put into a small bowl with some warm water. They don't need to cook, just unthaw a little. Let peas unthaw for about 15 minutes. You can also put them in the microwave and heat 1 to 2 mintutes to quickly dethaw them. Drain the peas once they are dethawed. Add the dijon mustard to a small bowl. Then add the olive oil to the dijon mustard. Blend ingredients with a whisk or a fork until well blended. You can add more olive oil to the mixture to make it more fluid if you feel the mixture is too stiff for a dressing.
Add the green pepper, celery, drained peas, and black olives to the potatos in the bowl. Mix the ingredients until blended. Add the dijon mustard olive oil dressing to the potato mixture. Stir until blended. Add the dill and parsley to the potato mixture and stir until blended and everything seems well coated.
Source: Free Articles from ArticlesFactory.com
How to Cook White's Fish Pie
You'll be impressed with the simplicity of this recipe and its sophisticated taste.
So How to Cook White's Fish Pie?
For sauce: 750 ml dry white wine 600 ml water 500 ml double cream 2 x Knorr Fish stock cubes 1 x Knorr Chicken stock cube For pie: 1 salmon fillet 1 cod fillet 1 smoked haddock fillet 4 scallops 1 small leek Chopped parsley Mashed potato
To make the sauce:
* Put wine, water and stock cubes in a large saucepan and bring to the boil. Once it comes to the boil and the stock cubes have dissolved continue to boil in order to reduce your stock until there is only about a centimetre left in the pan.
* Strain the stock through a fine sieve into a clean pan and then add the cream. Put back on the heat and simmer gently until cream and stock are well blended . Taste to test. (If sauce is too thick simmer to reduce further).
To make mashed potato:
* Make sufficient mashed potato to cover two gratin dishes. Remember you will be putting your potato in a piping bag so it needs to be very smooth and fairly wet.
* Make sure your potato are seasoned and then blend with either cream or milk until silky smooth, making sure there are no lumps.
Make a little more than you will need. Better to have too much than too little.
To make the pie:
* You will need two gratin dishes (approximately 23 cm long) and deep enough for your fish and the mash on top.
* Remove any skin from you fish fillets and the cut into cubes. Cut scallops in half.
* Finely chop parsley.
* Very thinly slice the white of the leek so that when you break it into rings you have enough to loosely cover the gratin dish. You only want a mild hint of leek.
* Use two small saucepans and put half the sauce in each. Gently warm the sauce and when simmering add the fish. Simmer for two to three minutes. Remove from heat.
* With a slotted spoon put the fish in your gratin dish. Add five to six tablespoons of sauce to cover the fish but not so they are swimming in it.
* Arrange leek rings over the top and then scatter parsley over the topFree Articles, again in moderation.
* Then using a piping bag cover with swirls of mashed potato (if you wish you could add some grated gruyere on top of the mash).
* Place in the top half of preheated oven on Gas Mark 7 / 220°C for twenty minutes. Remove and serve.

How to Cook Fish in Garlic Sauce
Use only Clarified butter (dont think of using margarine) Dust the fillets lightly with flour. Meanwhile, heat some of the clarified butter in a frying pan until hot but not smoking. Saute the fish until lightly browned (some Mexican cooks fry fish until it is the approximate consistancy of our potato chips , but I feel this is taking authenticity a bit too far :-
Remove the fish from the pan, and add additional butter if needed (you will want about 2-3 Tbsp. of melted butter per fillet to sauce the finished dish). Add garlic to the pan and saute garlic until it is a light brown color. Do not allow it to burn, but do allow the garlic to take on some color and become slightly crisp. Squeeze in the lime juice. Pour the hot butter/garlic mixture over the fish, and serve. This dish is quite common in Southern Mexico, and traditionally would be served with black beans (either whole or refried); perhaps a simple dish of rice, cooked in chicken broth with chopped cilantro and a few diced green chiles; a side relish of homemade fresh salsa (see Pico de Gallo).
Remove any skin and bones from fish, rinse and pat dry with paper towels. Cut into large chunks. Mix together cumin, coriander, ground anise, chile powder, garlic, lemon juice and salt, blending to a smooth paste. Spread over fish, cover and refrigerate 1 hour. Half-fill a deep pan or deep-fryer with oil and heat to 350 degrees F. or until a 1-inch bread cube browns in 50 seconds. Cook fish, a few pieces at a time, 2 to 3 minutes, until golden brown. Drain on paper towels. Serve hotScience Articles, garnished with lettuce and radish slices.

How to Cook Fast Chinese Food
These days many of us are out of our home for over ten hours in a day, and there is little time to prepare a good and rather healthy meal. I’m going to review some tips that will save you time in preparation your Chinese meals. Here are some great quick ways to cook your Chinese food fast:
1. Use common ingredients as substitute for hard-to-find ingredients. Some Asian foods may not be available in your local grocery store. You may substitute other foods when cooking your meals. If you need Asparagus in your dish, you can substitute broccoli, string beans, and other green vegetables. Another example would be substitution for black mushrooms. You can use fresh American mushrooms.
2. Buy food ingredients in larger quantity. A) Buy a whole chicken. Remove the bones or debone the chicken and use the bones for soup stock. Use the chicken meat for your Chinese dishes to be stir fried with vegetables for your refrigerator. B) Another technique is to buy a fresh fish like walleye or tilapia. Remove the bones from the fish known as filleting the fish. Save the bones for soup stock and use the fillet part of the fish for stir frying. As you can see there are numerous ways, use food when buying in bulk.
3. Make several meals from bulk purchase. For the chicken that is not used in your large quantity purchase, keep it in an aluminum foil, and place in the freezer for your next meal. For a fast and easily thawing technique, place the aluminum foil with fish between two pieces of meat.
4. Use leftover food for your meals. If you could a Chinese vegetable dish for the previous night, you can easily as some noodles or rice to make it meal one day or two later. Or, you may a few pieces of steak with some spices to give your new meal a bit more flavor. I would advise using food as meal if it’s been there for several weeks since you may get ill from eating it.
5. Make some quick bites if you’re really pressed for time. Buy some frozen steam buns from the store. It comes in a variety of flavors from red bean paste, black bean paste, and chicken or meat filling. Steam a few extra buns for breakfast and leave a few cooked one in the refrigerator. Microwave the steam buns for an afternoon or evening snack.
6. Save energy and fuel by using your equipment efficiently. When you’re steaming those buns, you can use the other layers of the steamer to steam other food items too. Most good steamers have two or three levels to steam food. Buy a three level steamer if plan buy one. You can steam a variety of food for your meals like meats, vegetables, and even cooked rice.
7. Prepare sauces in advance. Put your favorite sauces together in a jar, and store them for later use. We have a 12 oz. jar of black bean sauce, but put it away in the refrigerator to store away for up to 3 weeks. When we need that right flavor in our mealsHealth Fitness Articles, we take a few teaspoons and put in right into our wok. We're ready with our meals within minutes.

Source: Free Articles from ArticlesFactory.com
ABOUT THE AUTHOR
Tristan Lum invites Asian food fanatics to cook better than five star restaurants. Impress friends & family with great tasting Chinese food! Instantly receive five days of exclusive audio and video on Chinese cooking at http://www.wokfusion.com.
How to Cook Very Tasty Fried Vegetable
How to Cook Very Tasty Fried Vegetable
Heat up a little canola oil, or whatever you like to stir-fry with, in a deep pan or wok. Put the harder vegetables in first, and cook them hot, stir-frying them to keep them from getting burned. When those are starting to soften, turn down the heat a touch and add the "softer" vegetables, like squash and mushrooms. Add a little more oil if you must, and stir-fry everything until the new vegetables start to get tender. When they're done, so are you.
The vegetables I like to use in this recipe is pretty similar to the stuff I like to steam. Yellow & zucchini squash, zucchini peel (not kidding; try it!), white mushrooms, shiitake mushrooms, broccoli, broccoli stem sticks, lotus root or rootlets, bamboo, bean sprouts, cabbage, and carrots are the most common ones. Because lotus is very tough and fiber-y, I parboil them for about 10 minutes before frying them.
Only the best is good enough for the King and entourage. Aesthetically pleasing food presentation and colour contrast are important focal points in the Royal cuisine. Thai cooks are true masters in carving vegetables. A typical Thai meal is a communal affair and meant for at least two, mostly for four or more. Everything is served at once and consumed with steamed rice. Essentially, rice is the starch base, flavoured with vegetables, protein and sauce.
Flavourful soups are meat or vegetable broth or coconut cream based with a blend of herbs and spices providing the flavour. In Thai tradition, soup is served along with other dishes more as a "lubricant" and flavour contrast to steamed rice. Thai curries consist of pastes of fresh herbs and spices cooed with coconut cream before adding meat or vegetable. Main curry ingredients are chilli peppers, garlic, shallot, galangal, coriander root and brachia (a small brownish orange). Canned curries never taste as satisfying as a fresh made from scratch. For more details http://www.indomunch.com
Source: Free Articles from ArticlesFactory.com

How to Cook Turkey on Natural Gas Grills
The holidays bring with them thoughts of carving and serving delicious turkey dinners to your family and friends. Tradition has its fans, but perhaps this year you'd like to try a twist to your turkey recipe. If you have a gas grill and enjoy the smoky flavor of grilled meats, why not try grilling your turkey this year? It's not only possible, it is rather simple. And it delivers a delicious flavored bird to your table. Plus, having the turkey on the grill instead of the oven leaves you with all the room you need to prepare the rest of your dinner in less time.
When you are ready to buy your turkey, the first thing to consider is the size of your grill. You don't want a bird that is so enormous that it can't fit on the grill rack. Ideally, the turkey you select should sit on the grill and the lid should close without touching the bird. If this isn't possible, don't worry, you can still grill your turkey. You'll need some heavy duty aluminum foil and either a V shaped grill stand or another metal cooking instrument that you can safely use to prop open the lid of the grill.
Prepare and stuff the turkey as you normally would. Place it on the grill so that it is positioned over one burner that you can turn off. Turn that burner off and the other burner or burners on. Since you can't really "flip" a turkey, you want the turkey to cook by indirect heat, not by a direct flame underneath it.
You get the smoky flavor by using wood chips. If you haven't used wood chips before, they're easy to use. You soak them in water so that as they dry out from the heat of the grill, they'll release a flavored smoke that infuses the turkey. You can purchase a tray that is designed for putting wood chips on the grill or you can make one yourself from heavy duty aluminum foil. Take the wood chips out of the water and put them into your tray. Place the tray on the grill over the lit burner.
Next, close the lid fully if possible. If not possible, prop the lid up just enough to keep it from touching the turkey. Then cover the remainder of the opening with aluminum foil. If heat gets out you will probably have to cook the turkey longer. However, the foil creates enough of a barrier so the smoke is kept circulating inside the grill and flavoring the turkey.
The time required to cook the turkey will vary depending on whether or not you were able to close your grill completely. If you can, it will take less time. If you can't, you might want to increase the heat on the other burner or burners to try to make up for the lost heat by having to prop open the grill. After a couple of hours, rotate the turkey 180 degrees to help ensure even cooking.
As with any method of cooking poultry, it's important to make sure that the internal temperature of the meat reaches 160 degrees Fahrenheit. Ideally you should use a meat thermometer to monitor the temperature as you cook. If you don't have one, then you'll have to check the readiness by poking the thigh with a fork or skewer. If the juices that run out are clear and the turkey has turned a nice golden-brown color, then you are ready to remove it from the grill. Consider glazing the turkey with a sauce you use on other meats, or possibly adding barbecue sauce to the traditional cranberry sauce as a condiment. Don't be afraid to experiment - enjoy the new twist you're putting on an old family tradition.
Source: Free Articles from ArticlesFactory.com

How to Cook Asparagus
Asparagus grows wild in many parts of Andalucia and as a result hasalways formed a part of the Mediterranean Diet which is now being hailed as one of the healthiest in the world. Asparagus plays its part in this conclusionas it is an excellent source of vitamins A, C, K, B1, B2 and folate.
Folate is of particular importance in helping to maintain cardiovascular healthand in helping to prevent certain birth defects.
Another ingredient in asparagus is inulin which helps to promote healthyflora in your gut and it also contains significant levels of the anti-oxidantselenium.
If all this isn't enough to make you want to include asparagus in your diet,it tastes good too! and here are some great recipes for cooking asparagusapart from just boiling it and covering it in butter.
You can use either wild or cultivated asparagus for these recipes.
Asparagus a la Andaluza.
Ingredients.
500grs. asparagus50ml. olive oil4 eggs1 slice of bread diced without crusts.
2 cloves garlic1 tsp. paprikaHalf tsp. cumin150 ml. water + 1 tbs.
1 tbs. vinegarsalt and pepper
Method.
Discard the woody ends of the asparagus, chop remainder into short lengths and blanch in boiling water for 2 mins.
Drain well. Heat the oil in a flame proof casserole dish and fry the bread and garlic until toasted.
Place in a blender with the paprika,cumin, vinegar, tablespoon of waterand the salt and pepper. Sauté the drained asparagus in the oil for 5 mins.
Add the mixture from the blender and simmer for about 15 mins. until the asparagus istender.
Add more water if required.
The sauce should be thick but not dry.
Break the eggs, one per person, on top of the cooked asparagus,sprinkle with paprika and place in the oven until the eggs are set.
Serves 4 as a starter or a side dish, good with Swordfish.
Asparagus Gratinados Ingredients.
1 kilo asparagus3 tbs. butter50 grs. grated cheese1 tbs. chopped onion50 grms. chopped ham2 tbs. flour220 ml. milksalt and pepper
Method.
Cut off the thick ends of the asparagus, tie in bundles and cook standingupright in plenty of salted water until tender, approx. 10 mins.
Drain well and place on buttered dish.
Melt the butter and sauté the onion and ham for a few minutes. Stir in the flour,çadd the milk and cook slowly until it has thickened.
Season with salt and pepper.
Pour the sauce evenly over the cooked asparagus and sprinkle with the grated cheese.
Place in a hot oven or brown under the grill until the top is crisp and bubbly.
Serves 6.
Scrambled eggs with Asparagus.
Ingredients.
100 grams of asparagus tips.
100 grams ham2 tbs butter4 eggsPsychology Articles, beaten wellsalt and pepper.
Blanch the asparagus tips in boiling water. Dice the ham. Melt the butterin a frying pan and sauté the ham and asparagus tips for a few minutes.
Add the beaten eggs along with the salt and pepper and stir over a lowheat until the eggs are set.
Makes a light supper or lunch dish for 2 served with crispy bread.
Source: Free Articles from ArticlesFactory.com
ABOUT THE AUTHOR
Article submitted by Ruth Polak the owner of www.costadelsol-vacationrentals.comA web site specializing in holiday villas and apartments on the Costa del Sol and in Rural Andalucia. You will also find lots of information about Spain and Andalucia, in particular.

Chocolate Blanc-Mange
Put one quart of milk in the double-boiler, and place on the fire. Sprinkle into it one level tablespoonful of sea-moss farina. Cover, and cook until the mixture looks white, stirring frequently.
It will take about twenty minutes. While the milk and farina are cooking, shave two ounces of Walter Baker & Co.'s Premium No. 1 Chocolate, and put it into a small pan with four tablespoonfuls of sugar and two of boiling water. Stir over a hot fire until smooth and glossy, then stir into the cooked mixture.
Add a saltspoonful of salt and a teaspoonful of vanilla. Strain, and turn into a mould that has been rinsed in cold water. Set the mould in a cold place, and do not disturb it until the blanc-mange is cold and firm. Serve with sugar and cream.

How to Cook Artichoke Soup
lb. each of artichokes and potatoes,
1 Spanish onion,
1 oz. of butter,
1 pint of milk,
and pepper and salt to taste.
Peel, wash, and cut into dice the artichokes, potatoes, and onion. Cook them until tender in 1 quart of water with the butter and seasoning. When the vegetables are tender rub them through a sieve. Return the liquid to the saucepan, add the milk, and boil the soup up again. Add water if the soup is too thick. Serve with Allinson plain rusksFind Article, or small dice of bread fried crisp in butter or vege-butter.

How to Cook Stuffed Milkfish ( Rellenong Bangus )
Milkfish, or bangus as it is locally called here in the Philippines is our national fish. This fish is one of the many staple diets by filipinos although milkfish is wide spread in south east asia. Countries like Indonesia and Taiwan have milkfish also in their diet. To describe this fish, the scales are bright silver. Slender body and the largest I’ve seen is about two feet. They thrive either in fresh water lakes, brackish water and salt water. When cooked, the flesh is white as milk ( that is why it called milkfish ) and lots of needle like fish bone on it’s flesh. Wide spread throughout the islands but the most tasty ones comes from Dagupan ( northern part of Luzon, Philippines ). There are many milkfish recipes available and stuffed milkfish or rellenong bangus is one of the best.
Stuffed Milkfish ( Rellenong Bangus )
large sized bangus ( milkfish )1 onion, chopped finely4 cloves garlic, minced1 small sized carrot, small cubes1 box raisins ( optional )2 tomatoes, chopped1 raw egg, large1 tsp. Vetsin ( monosodium glutamate )1 tsp. Salt½ tsp. Worcestershire sauce1 green bell pepper, chopped finely 2 tbsp. Flourcooking oil for frying* Scrape fish scales. Clean. Gently pound fish to loosen meat from the skin. Use flat side of a knife in pounding.
* Break the big bone at the nape and on the tail. Insert the end of the handle of an aluminum kitchen turner (sandok) through the fish neck.
* Gently scrape down the handle between the meat and the skin. Scrape down to the tail, going around and on the other side of the fish.
* If you feel the meat is entirely separated from the skin, remove the handle, squeeze and push out meat (with the big bone), starting from the tail going out through the head. This way, you will be able to push out the whole meat without cutting an opening on the skin.
* Marinate skin and head of fish with soy sauce and calamansi ( lime ) juice. Set aside. Boil fish meat in a little water. Drain. Pick out bones. Flake meat.
* Saute garlic until brown. Add onion and tomatoes. Stir in fish meat, carrot, and pepper. Season with salt, vetsin, ground pepper, and Worcestershire sauce. Add raisins.
* Transfer cooked mixture to a plate. Cook, then, add raw egg and flour. Fill in mixture in bangus skin. Wrap bangus in wilted banana leaves or in aluminum foil. Fry. Cool before slicing.
* Garnish with sliced fresh tomatoFree Reprint Articles, spring onions or parsley. Serve with catsup.

How to Cook Pasta Carbonara
Pasta Carbonara Ingredients list:
1 lb of bacon if you are going to prepare the US version, 1/4- 1/2 lb of pancetta or prosciutto, they both have a very strong flavor so use sparingly depending on your tastes. 1 lb of linguine, 2-3 eggs, 1/4-1/3 cup of Italian parsley fresh if available, a really good parmesan cheese grated, salt and fresh ground pepper to taste.
1. Cut your pork products into lard-on strips, or 1/4" strips and then saute/render your pork product that you desire in you dish. You want to get the pieces crisp but not too done. Remove the cooked pork with a slotted spoon and pat dry and hold for later.
2. You will get your water going for your pasta. Follow the instructions on the box for your pasta. Just remember to salt your water. Stir in the pasta and make sure it is fully covered with the water. Cook until done but not overcooked. You will still want some bite to the pasta or al dente- firm to the bite. You can bite into the pasta, look at the center and you will see whether it is done or not by noticing the center. If it is not the same color all the way through then it is still not done. Practice makes perfect on this step. But you will definitely now if it is overcooked, it will be mushy and will fall apart on you.
3. You will first want to have a separate pot of simmering or close to boiling water. You will want to add the eggs to this water only for about 20-30 seconds to kill any bacteria such as salmonella. Remove from the water and rinse and then immediately break into bowl. Beat the eggs very well or thoroughly in a mixing bowl that you can serve this dish in.
4. When the pasta is fully cooked, drain it and try to remove all excess water. Do not rinse!
5. Put the drained pasta into the serving dish with the eggs and toss the pasta into the egg mixture. The heat from the pasta will cook the egg mixture. Just make sure you stir well, but be careful not to cut your pasta.
6. Add your pork products, parsley and cheese at this point and give it another toss. Plate it up, pour yourself and guest some wine, and break bread together.
This is a very classical Italian dish as I stated before. Just take precautions when preparing the egg mixture. And I hope that you enjoy this dishComputer Technology Articles, if you like you can use bacon or sausage and eat for a breakfast meal served with danish or some type of bread.

How to Cook Secret Restaurant Dishes At Home
While it is enjoyable to dine out now and again, there is nothing better than eating food that is prepared at home. Despite what many people think, you do not need to attend a fancy culinary school to cook delicious food just like the dishes you enjoy at your favorite restaurants. While for many, the secret to these famous restaurant recipes remains a mystery, the top secret recipes from America’s most popular restaurants have indeed been decoded. Just visit our blog and you find everythin you want here.
The CEO’s of these corporations do not want you to have these recipes. With the help of expert chef’s and thousands of kitchen testers, these copycat recipes have been fine tuned to taste exactly like the authentic restaurant versions. Finally, the secrets have been unlocked from the kitchens of Applebee’s, Boston Market, Chili’s, Hard Rock Café, KFC, Macaroni Grill, Olive Garden, Outback Steakhouse, Red Lobster, Taco Bell, T.G.I. Friday’s, Wendy’s & many more!
The bills from your favorite restaurants can sure add up at the end of the month. When you cook these same mouth watering meals in your own home, you save tons of money. You would be surprised to know that you probably have many of the necessary ingredients to prepare these copycat recipes already in your kitchen.
How to Cook Steamed Vegetables
Vegetable steamers have been used for hundreds of years. Originally, steamers were made out of bamboo, but now steamers are available in several varieties. Simple bamboo steamers are still being used, as well as metal versions. Stand-alone appliances are also available that are able to steam multiple foods on different levels at the same time. Here are some tips for their use.
Choose a vegetable steamer basket, if space is at a minimum. A steamer basket is made out of metal, with feet that keep the bottom of the basket above the water. Place the basket in the bottom of a 2-quart saucepan. Add water, but do not let the water cover the bottom of the basket. Boil water. After water is boiling, add vegetables and turn burner temperature down to medium. Cover pan with a tight-fitting lid. Steam vegetables to desired tenderness.
Steam vegetables in the microwave in a plastic steamer. Place vegetables on the steamer tray, and add water in recessed area. Put lid on tray. Microwave until vegetables are desired tenderness.
Buy an electric steamerArticle Search, if counter space is available. Fill the bottom of your steamer with water. Add vegetables to steamer bowl. Cover with lid. Read the accompanying instruction manual to determine how long to set the timer for vegetables being cooked. Enjoy eating nutritious vegetables no matter what type of steamer is used. Ready you are steamed vegetables Please visit in the site www. indomunch.com for extra details.
Source: Free Articles from ArticlesFactory.com

How To Cook Low Calorie Dessert Recipes
Even if you are counting calories, you can afford to enjoy mouthwatering puddings if you cook special low calorie recipes at home.
Just cut back on fat content, use extra fruit where you can, and avoid high calorie pastry crusts. You may be surprised how many delicious guilt-free desserts are available to you, just by making little changes to recipes.
Queen of Puddings This is a healthier version of an old-fashioned dessert recipe, which layers fresh breadcrumbs, jam and meringue.
This recipe uses much less fat and sugar and has 170 calories per serving.
Ingredients
* 1 large lemon
* 75 grams fresh white breadcrumbs
* 15 grams butter
* 65 grams caster sugar
* 450 ml skimmed milk
* 3 large eggs
* l tbsp sugar free strawberry jam
* sliced strawberries for decoration (optional)
Place the finely grated rind of the lemon in a bowl with the breadcrumbs, butter and 15 grams of the sugar. Heat the milk until hot, but not boiling, and pour on to the breadcrumbs. Mix well, cover, and leave to stand for 1 hour.
Separate the eggs. Reserve 3 yolks and 2 whites. Whisk the 3 egg yolks into the breadcrumb mixture, then pour into a buttered 850ml pie dish. Cook in the centre of the oven for 45 minutes until the pudding is lightly firm to the touch.
Leaving the oven on, remove the dish and carefully spread the jam evenly over the top of the pudding. Whisk the 2 egg whites in a bowl until stiff but not dry. Gradually whisk in the rest of the sugar, a little at a time, to make a stiff and shiny meringue. Spoon or pipe the meringue on top of the pudding. Return to the oven for about 10-15 minutes until lightly browned.
Decorate with strawberry slices, or serve them separately. Serve the dessert hot from the oven.
Strawberry and Apple Crumble
This is a high fibre, healthy recipe, to be served warm with skimmed milk custard or yogurt. It has a low calorie count of 155 per portion. Ingredients (serves 4)
* 450 grams cooking apples
* 150 grams strawberries
* 30 ml low calorie sweetener
* half teaspoon cinnamon
* 2 tbsp orange juice
For the Crumble
* 3 tbsp plain wholemeal flour
* 50 grams porridge oats
* 25 grams low fat spread
Preheat the oven to Gas mark 4 (180 degrees Celsius). Peel, core and slice the apples. Halve the strawberries and toss together with the apples, sweetener, cinnamon and orange juice. Put the ingredients into a 1.2 litre ovenproof dish, or four individual dishes.
Combine the flour and oats in a bowl and mix in the low fat spread with a fork. Sprinkle the crumble evenly over the fruit. Bake for 40-45 minutes (or 20-25 minutes for individual dishes) until golden brown and bubbling. Serve warm, with custard or yogurt.
Summer Pudding
This summer recipe is packed with healthy fruit and has 160 calories per serving. Ingredients (serves 6)
* 600 grams mixed summer fruit (raspberries, blueberries,
redcurrants, sliced strawberries)
* 2 ripe peaches or nectarines, stoned and diced
* 3 tbsp sugar, or to taste
* 150ml cranberry juice
* 8 thin slices white bread, 1-2 days old
* reduced fat crème fraiche to serve (optional)
Crush the fruit types individually, making sure the skins are broken and the fruit is pulpy. Put all the fruit in a bowl with the sugar and cranberry juice and stir. Leave to soften for 2 hours.
Remove the crusts from the bread and cut the slices into strips or triangles. Using a 1 litre pudding basin, fit the bread to line the bottom and sides, reserving enough to cover the top. Fill any gaps with small bits of bread.
Reserve 2-4 tbsp of juice from the fruit, then gently tip the fruit mixture into the bread-lined pudding basin. Top with the remaining bread. Cover with a plate that just fits within the rim of the basin, putting it directly on top of the bread. Place a heavy weight, such as a can of food, on top and put the pudding in the fridge to chill for 8 hours or overnight.
To serve, turn the pudding onto a serving dish. Use the reserved juice to brush or pour over any parts of the bread that have not been coloured. Serve with crème fraiche if liked.
Light Pastries One
pastry that can be used in a low calorie dessert is light filo. It needs only a brush of sunflower oil between the pastry sheets. Cut it into squares to fit into small patty tins and overlap three little sheets in each tin to form a basket effect. Bake for 6-8 minutes at Gas mark 6 (200 degrees Celsius) until crisp. Cool and fill with yogurt mixed with diced fresh fruit, reserving some for decoration. These have about 130 calories each.

How to Cook Pancakes from Scratch

Making pancakes is not hard at all. You can make delicious fluffy pancakes with just a few simple steps. Make sure you have a recipe to follow and that you buy all the ingredients you will need ahead of time so that you aren't missing anything later on.
Step one, measure the dry ingredients correctly. If the recipe calls for sifted flour, make sure put it through a sifter as instructed. Make sure you measure out the right amount of the ingredients or you could end up with a mess in the end.
Now you will need to correctly measure out the wet ingredients. Again, precision is key. Use a liquid measuring cup to measure out all the wet ingredients including the milk and oil. Open up the eggs one at a time separately and break up the yolks.
Make two separate bowls, one for the wet ingredients, and one for the dry ingredients. Mix them each separately very well. Stir the dry ingredients with a spoon and beat the wet ingredients together so that they are completely incorporated.
Pour all the wet ingredients into the bowl of dry ingredients. Gently stir it together, but be careful not to over-beat. Vigorously beating the batter will result in tough, undesirable pancakes that no one will want to eat.
Now you will need to retrieve your pan or griddle. I like to use a big electric griddle that I can plug in away from the stove. Use a little bit of oil or butter to lightly grease the pan. You could also use cooking spray for this step. Heat the pan to medium high heat.
Next, use a measuring cup or a ladle to pour about 1/4 cup of batter onto the pan. Space the pancakes out about 2 or so inches apart. If you want the pancakes to be bigger or smaller, use the batter accordingly.
Tiny bubbles will soon begin to form about a minute after pouring. Now is the time to flip them. Cook them on the pan for another minute or until golden brow. Serve warm with syrup and butter.
About the Author
Joan knows a lot about pancakes and cooking. Find out more about how to make pancakes and find lots of easy and delicious pancake recipes.
How to Cook Chili Chicken with Basil and Coconut
Thickened with peanuts like some Veracruz sauces, and made with the classic Mexican technique of blending and then frying the sauce ingredients, this mild chili makes for an earthy modern-day meal. Heat a large saucepan over medium heat, add olive oil. Chop the chicken into bite-size pieces and add to the saucepan. Brown the chicken till done, about 10-12 minutes. Add all canned ingredients, then all the spices. Stir well. Bring to a boil, then reduce heat and simmer 20-30 minutes, stirring occasionally. Add salt and pepper to taste. Serve with sour cream, cheese, chives or anything you would put on chili.
use less chili pepper if you prefer milder heat levels. Coconut cream is available in Asian markets and some supermarkets; if you can't find it, here's the perfect substitute: Open a can of coconut milk without shaking it first, and use the thick cream at the top plus enough of the milk to make one cup. It’s time for a recipe. Lately, between playing free rice and writing my novel (I’m actually using my outline and writing five pages a day), I’ve been been reading recipes and trying to come up with the perfect white chicken chili.
I’m ready to share this one, although if you make it, you should feel free to make alterations to it. Every time I make it, I love it more than I did the last time, and I suspect that’s because I never make it the same way twice. In a large skillet over medium-high heat, brown the onions until translucent and then add the chicken, stirring occasionally until all the pieces are evenly brown. Set aside. In a Dutch oven, over medium heat, bring the chicken broth and green chile peppers to a boil. Stir in the cans of cannellini beans, corn, garlic, cumin, crushed red pepper, smoked paprika, and chili powder. Stir in the chicken and onion mixture.
Let cook for a long time, at least a half hour, and then add the cream of chicken soup. I usually put the sour cream in it after it’s cooked, although if it seems to need thickening, I add more. I apologize for the can of cream of chicken soup. I usually hate recipes that call for canned soup, but once I made this recipe and left it out, and…well, it didn’t taste as good. I’m sorry to say this, but it’s true. I suppose a more ambitious person could create their own cream of chicken stuff that would be just as good, but this recipe has the advantage of being quick, easy, and tastes wonderful on a cold evening. And it’s even better the next night! And by the third night, it’s the best thing you ever put in your mouth!
ource: Free Articles from ArticlesFactory.com
ABOUT THE AUTHOR
Representing the Chili Chicken with Basil and Coconut in the website http://indomunch.com/.

How To Cook Yummy Cookies
I don't know what it is but there are some smells that bring back fond memories and one of them is the whiff of a freshly baked cookie. I feel glad and think I was taken to a heaven-like place whenever I get a whiff on the sweet distinctive smell of a cookie although I do not have an intense desire on any sweet stuff or chocolates. All I am aspiring is to have the cookie with a cup of my favorite coffee and take it to a very peaceful place like heaven and enjoy it on my own. Not only eating these freshly baked cookies that would make it an exciting and enjoyable but the mere fact of baking it, adds up for satisfaction.It absolutely creates harmony and joy with your kids doing the cookie baking with them thereby reminisces your childhood days of baking experience either. Those happy moments with my grandma while mixing all the cookie ingredients and shaping it into the tray for baking are my childhood memories which I always treasure. I felt so special when she let me lick the mixing bowl clean of the cookie mixture too! How could I forget when she ask me to take a lick on the last spot of the cookie mixture on the mixing bowl!I could still remember when she allow me to lick on the last drop of the cookie mixture on the mixing bowl too! Anyway, my daughter was only four years then when I started allowing her to join me in baking cookies which was also her first experience doing it.We really had fun and had a great time baking although mixing it is quite messy but the cookies turn out to be good afterall.
Moreover, I would highly recommend to those families to try baking some cookies, and rest assured you'll gonna experience great fun and quality time to your kids too. You don't have to be a wonderful cook; in fact you can buy cookie mixes that you just have to add water to so you have more chance of baking great cookies. It does not follow that you must be excellent in baking but you may however buy an instant cookie mixture to your nearby stores and enjoy its awesome feeling that would give your entire family. You still have the option of getting the cookie dough, but it is the process of making the mixture that is more enjoyable to do especially with your kids.Making it into different shapes and decorating those cookies are another exciting things that would be appreciated by your kids. These cookies could also be presented by your kids as gifts or even sell it especially it is a homemade one.Being a homemade cookie, this might be well appreciated by your friends and relatives especially made by your grandchild during special occasions wherein you can be proud of rather than buying one that is bought outside
Everyone likes cookies: kids, parents, grandparents, friends, and the list could go on. There is just nothing much better than warm cookies right out of the oven to kids of all ages. Making your kids exposed in kitchen activities would somehow be educational with them even at an early age. Even the little ones are so impressed by cookies "they made themselves" even though they may have only stirred the dough, added an ingredient, or sprinkled on some colored sugar decorations. Now, homemade cookies are excellent for all kinds of occasions even sharing these as simple gifts to your teachers, friends and relatives or simply to show your utmost love and care to your mom and dad even without occasions.
by Drago Marx

How to Cook Perfect Pasta Everytime
First and most important use plenty of water. Using too little water will make for sticky gooey pasta. You should start with about 4 quarts of fresh cool water. This means take out that big spaghetti pot and stop using your favorite sauce pan. As you portion out the pasta you should cook about 2 ounces per person. Bring the fresh cool water to a rolling boil. Once the water is boiling, but before adding the noodles, add 1 heaping tablespoon of salt for every four servings. Always add the salt to the water. If you wait until the pasta is cooked you will end up with salty noodles. By adding the salt now the pasta can absorb the salt and your pasta will taste better. Finally add the pasta, allow the water to soften the noodles and stir gently. Never allow the noodles to stick to the bottom of the pan.
Angle hair pasta and spaghetti should take about 8-10 minutes to cook; heavier noodles such as penne can take up to 20-25 minutes. To test for doneness just scoop out one noodle and taste it. You can cook the noodles a couple of minutes longer for softer pasta.
Once the pasta is cooked drain it in a large colander or strainer. Immediately pour the pasta back into the hot pot it cooked in. Never run the pasta under waterFree Reprint Articles, this only serves to weaken the taste. In the pot mix a small amount of butter and sauce in with the pasta. This will keep the pasta moist until it is time to serve. The sauce should be added in larger quantities at the table or as you are serving.
ABOUT THE AUTHOR
Shauna Hanus is a gourmet cook who specializes in creating gourmet meal plans. She has extensive experience cooking with easy to find grocery items to create delightful gourmet meals. She is also the publisher of a no cost bi-monthly gourmet newsletter. Her newsletter is always fun and informational packed with tips and trivia you can use everyday.

How to Cook Steak
Steak, though a grill favorite, can be cooked in several other ways. They can be pan-fried, braised, broiled, baked, etc. Selecting the proper method for cooking steak depends on its tenderness. There are dry heat methods and moist methods. Dry heat methods are generally applied for more tender steaks such as filet mignon and sirloin, while moist heat methods are more suited to tougher cuts of beef. The water helps in tenderizing the steak.
The tenderness of cooked steak is influenced by how much it is \'done\'. Depending on the time for which the steak is cooked, it may be raw, very rare, rare, medium rare, medium, medium well-done and well-done. Rare steaks are exposed to the flame for a very short time. They still maintain their rawness and are very pink in color. Rarely done steaks maintain their original beefy flavors, but they are not very healthy as they still contain microorganisms. As the cooking time increases, the pinkness of steak gets converted to brownness and its juiciness also reduces. Well-done steaks are brown throughout and also tough to chew. For ordinary palates, medium rare steaks are the best bets.
The best way to cook a steak is definitely grilling it. Everything matters while grilling a steak – the tenderness of steak, the marinade, the quality of the coal and lighter fluid and even the concentration of the person cooking. Most steaks require about 8-10 minutes on the barbeque. The time will depend on the degree of doneness required.
Tender cuts can also be broiled. Broiling is done in the oven with no liquids used. It gives a different flavor from grilling as in an oven the heat surrounds the meat from all sides. Less tender cuts can also be broiled provided they are marinated earlier.
Thin and tender cuts of steak such as the sirloin, T-bone and rib-eye taste very well when they are pan-fried. Steaks are fried in an open pan placed over a flame. No oil is added. The steaks cook in their own fats.
If the cut of beef is bigger, then it is ideal for roasting. Roasting is also a dry heat cooking method that uses no liquid and no cover. Tender cuts roast better and they are to be sliced before serving.
Tough cuts of beef such as chuck, round, briskets and blade are usually braised. Braising is a moist-heat cooking method done with a little amount of liquid in an oven with a closed lid. It is a slow process as it slowly allows the meat to tenderize.
Another method for tough cuts is stewing. Beef is completely covered in water and cooked slowly over a medium flame. Stewing is not a very popular method for steaks; but if the cut is large enough and tough, then it better be put into the stew pot.
In all the methods of cooking steak, the degree of doneness is measured by using a meat thermometer. However, by practiceScience Articles, one can also judge the doneness by merely touching the steak externally.
Source: Free Articles from ArticlesFactory.com
ABOUT THE AUTHOR
Steak Recipe provides detailed information on Steak, Steak Recipe, How To Cook Steak, Grilling Steak and more. Steak Recipe is affiliated with Turkey Recipes.

How to cook australian lamb
At least once in the life time every person wants to know how to cook australian lamb.
It's not strange at all because it's very delicious. If you want to win the man you love, cook him australian lamb. You'll like the result:)
AUSTRALIAN LAMB
* 1 Australian Lamb leg, boneless and fresh
* 1 orange, halved and sliced
* 1 bunch fresh oregano freshly ground pepper and salt
* 3 tablespoons olive oil
* 1 white onion, diced
* 2 stalks celery, chopped
* 1 large carrot, peeled and diced
* 3 tablespoons tomato paste
* 1 12-ounce bottle Guinness or stout
* ¼ cup Worcestershire sauce
* 2 sprigs fresh thyme
POTATO AND TOMATO CAKE
* 4–6 scrubbed potatoes, halved and steamed until just tender
* 3 tablespoons olive oil
* 2 cloves garlic, crushed
* 1 8 ounce basket cherry tomatoes, halved
* 1 tablespoon fresh rosemary, chopped
* salt and freshly ground pepper, to taste
1. Preheat oven to 280-300°F. To prepare the lamb, cut 3-4 deep slashes on the top and insert orange slices with a sprig of oregano. Season outside of roast with salt and pepper.
2. Heat 2 tablespoons of olive oil in large casserole dish and brown meat on all sides. Remove meat from pan and add the remaining oil with onion, celery and carrot. Keep for 2-3 minutes or until soft, then put tomato paste. Cook, stirring until aromatic, for a minute.
3. Put lamb to the pot, add Guinness, Worcestershire sauce and thyme and boil it. Remove from heat, cover and transfer to preheated oven. Roast lamb for 2 ½ - 3 hours, or until tender and meat separates easily. Turn a few times during cooking. Be careful because it's very hot. Put meat to a platter, cover with foil and keep warm.
4. Strain pan juices and transfer to saucepan, spooning off any extra oil from the surface. Bring to a simmer and prepare over medium heat for 8-10 minutes or until thickened to a sauce consistency. Try to keep warm.
5. Now you have to prepare the Potato and Tomato cake. Crush potatoes slightly with a masher, keeping them chunky. Put in large bowl and toss with olive oil, garlic, tomatoes, and rosemary. Season to taste and spoon mixture into oiled pan, pressing down gently to flatten. Turn oven to broil and cook the mixture on the middle shelf for 10-12 minutes, or until crispy. Cut into service-sized "cakes".
Slice lamb thickly and serve with the Potato and Tomato Cakes.

How to cook aloe vera
I have never heard about this recipe before but there are so many things we haven't tried yet.
Sounds unusual but very healthy and delicious. So let's find out how to cook aloe vera...
How to Сook Raw Peanuts

The recipe is very simple and we are sure that next time you won't need to google in order to know how to cook raw peanuts.
The best you can do is to roast either shelled or unshelled raw peanuts in a 350F oven.
Put the peanuts in a single layer in a shallow baking pan.
Stir them every 5 minutes while roasting. Be careful they are very hot.
Roast shelled peanuts for 15-20 minutes (depends on how darkly you like them roasted). Remove from oven and allow to stay cooking in their retained heat.
Cool for about 15 minutes. Salt lightly if you like them to be salted. Eat, or, after fully cooled, place in an airtight container.
Don't let the peanuts burn, you won't like that taste!
If the peanuts are still in the shell and you want to roast them that way, roast for about 25 minutes. Stir after about 10 minutes and again at about 18-20 minutes. Remove from the oven. Keep them in the oven for some time to become perfectly cooked. Eat when still warm, but not too hot.
The peanuts can be kept for a couple of weeks at room temperature, about 6 months in the refrigerator, or you can freeze them for up to a year.
How to Cook Whole Chicken in a Barbecue Oven
So how do you cook whole chicken in a barbecue oven? Is it any different than cooking it in a traditional convection oven? Sure is. And we're going to share a few tips with you to make sure your chicken barbecues up just right!
Whole chickens are used a lot in commercial environments to cook for restaurants, company picnics and other large events where they're cooked in much larger ovens that will handle 20 to 40 chickens at one time.
For this article, I'll focus on how to cook whole chicken on a smaller scale, your barbecue oven, one chicken at a time.
1.Don't undercook or overcook chicken. It usually takes about 2-1/2 to 3 hours to barbecue and must be checked off and on to make sure it is not getting cooked too much, which will burn your chicken, but you don't want it undercooked either.
2.Keep your grill at low temperatures, about 230 to 250 degrees. The secret to most great barbecued chicken, one with moist, tender meat and smoky skin is to keep your grill at low temperatures and cook slowly. Don't think that the chicken is not cooking or getting done quick enough. Give it time and you will be happy with it at the end by just taking your time. Be patient and the end results will be very tasty.
3.Spice rub before you put chicken on the barbecue. Rubbing the chicken with spice rub is a great idea in the beginning will give it great taste at the end.
4.Add sauces at the end. Don't add any sauces until near the end of the barbecue. When the chicken is almost done, start applying the sauce. The sauce only needs about five minutes to cook on the chicken. Remove the chicken with tongs when you start seeing any signs of charring.
To bring this all together and make things work correctly on how to cook whole chicken, it takes patience and close attention to what you are doing in order to have your meal of chicken come out correctly and enjoy it after putting the time into barbecuing chicken. Add any vegetables to the chicken and make it a very healthy meal.
About the Author: Jim Musselman owns K & J Deli Cases, a food service equipment distribution company. Jim's company sells barbecue equipment, deli cases, coolers and restaurant equipment worldwide through his distributorship.


